forked from cadey/xesite
214 lines
9.8 KiB
Markdown
214 lines
9.8 KiB
Markdown
|
|
---
|
||
|
|
title: "My Convoluted VRChat Google Meet Setup"
|
||
|
|
date: 2021-02-24
|
||
|
|
tags:
|
||
|
|
- oculusquest2
|
||
|
|
- vr
|
||
|
|
- vrchat
|
||
|
|
---
|
||
|
|
|
||
|
|
# My Convoluted VRChat Google Meet Setup
|
||
|
|
|
||
|
|
Recently the place I work for sent us all VR headsets. I decided to see what it
|
||
|
|
would take to use that headset to make my camera show a virtual avatar instead
|
||
|
|
of my meat body face. This is the story of my journey through chaining things
|
||
|
|
together to make work meetings a bit more fun by using a 3D avatar instead of
|
||
|
|
myself in some of them.
|
||
|
|
|
||
|
|
[This post uses SVG for diagrams to help explain what's going on here. You may
|
||
|
|
need to use a browser with SVG support in order to get the best experience with
|
||
|
|
this article. All the diagrams will be explained after the fact so that people
|
||
|
|
using screen readers are not left out.](conversation://Mara/hacker)
|
||
|
|
|
||
|
|
<center>
|
||
|
|
|
||
|
|
<blockquote class="twitter-tweet"><p lang="en" dir="ltr">Working at <a href="https://twitter.com/Tailscale?ref_src=twsrc%5Etfw">@Tailscale</a> is great. They sent us all an Oculus Quest 2! <a href="https://t.co/dDhbwO9cFd">pic.twitter.com/dDhbwO9cFd</a></p>— Cadey A. Ratio (@theprincessxena) <a href="https://twitter.com/theprincessxena/status/1362871906597224456?ref_src=twsrc%5Etfw">February 19, 2021</a></blockquote> <script async src="https://platform.twitter.com/widgets.js" charset="utf-8"></script>
|
||
|
|
|
||
|
|
</center>
|
||
|
|
|
||
|
|
So, let's cover the basics from a high level. At a high level a webcam is just
|
||
|
|
a video source that may or may not have a microphone attached to it. So in
|
||
|
|
order to get my avatar to show up in a video call, I need some way to make some
|
||
|
|
window on my computer act as a webcam. This will make the overall dependency
|
||
|
|
list look like this (for those of you using screen readers I will describe
|
||
|
|
this diagram below):
|
||
|
|
|
||
|
|
<center>
|
||
|
|
|
||
|
|

|
||
|
|
|
||
|
|
</center>
|
||
|
|
|
||
|
|
VRChat renders to the Desktop which is picked up by OBS which has the ability
|
||
|
|
to pretend to be a webcam, which is finally picked up by Google Meet.
|
||
|
|
|
||
|
|
If the VR headset that I got from work was a tethered to the PC kind of VR
|
||
|
|
headset like the Valve Index or HTC Vive, the next steps would involve full
|
||
|
|
body tracking or something so that I could have my movements in real life
|
||
|
|
transfer into movements that my avatar makes.
|
||
|
|
|
||
|
|
However, the VR headset we got sent was an Oculus Quest 2. This is a
|
||
|
|
_standalone_ VR headset that is basically an Android tablet that you strap
|
||
|
|
to your face. This makes things a bit more technically challenging because
|
||
|
|
now you need some way to get the video to the headset and the motion tracking
|
||
|
|
data from the headset and to the computer at 90 times per second. This requires
|
||
|
|
a bit more cleverness.
|
||
|
|
|
||
|
|
The Oculus desktop software ships with a feature called Oculus Link that allows
|
||
|
|
you to use a gaming PC to render the VR data to your headset by sending the
|
||
|
|
video streams over USB. I had to dig around for a compatible cable (It needs to
|
||
|
|
be a specific kind of USB-3 to USB-C-3 cable with at least 5 gigabits per
|
||
|
|
second of transfer capacity) since the ones that
|
||
|
|
[Oculus sells](https://www.oculus.com/accessories/oculus-link/) are both at
|
||
|
|
least CAD$110 and out of stock anywhere I can find them in Canada. The 0.75
|
||
|
|
meter long cable I had been using was good enough to get me through the first
|
||
|
|
couple days of experimenting with VR, but it was clear that a better solution
|
||
|
|
was needed.
|
||
|
|
|
||
|
|
I did some digging and found a bit of software called
|
||
|
|
[ALVR](https://github.com/alvr-org/alvr#readme) that claimed to let me do VR
|
||
|
|
from my computer wirelessly. So I set it up on the Quest and on my tower,
|
||
|
|
which brought up the dependency graph to this:
|
||
|
|
|
||
|
|
<center>
|
||
|
|
|
||
|
|

|
||
|
|
|
||
|
|
</center>
|
||
|
|
|
||
|
|
ALVR talks with its counterpart on the Quest. This allows you to stream the VR
|
||
|
|
video and audio bidirectionally. You also need to bring Virtual Audio Cable
|
||
|
|
into the setup so that you can hear stuff in the game and so that other people
|
||
|
|
can hear you using the headset mic. However, ALVR is not available on the Quest
|
||
|
|
store. You need to install [SideQuest](https://sidequestvr.com/setup-howto) for
|
||
|
|
that.
|
||
|
|
|
||
|
|
[SideQuest lets you sideload Android APK files to your Quest 2 because the
|
||
|
|
Quest 2 is basically an Android tablet that you strap to your face!](conversation://Mara/happy)
|
||
|
|
|
||
|
|
So I used SideQuest to install the ALVR client on my Quest 2, and then I opened
|
||
|
|
up VRChat and was able to do everything I was able to do with the wired cable.
|
||
|
|
It worked beautifully until it didn't. I started running into issues with the
|
||
|
|
video stream just dying. The foveated encoding (tl;dr: attempting to hack the
|
||
|
|
image quality based on how eyes work so you don't notice the artifacting as
|
||
|
|
much) could only do so much and it just ended up not working. Even when I was
|
||
|
|
only doing it for short amounts of time. There is a lot of WiFi noise in my
|
||
|
|
apartment or something and it was really interfering with ALVR's stream
|
||
|
|
encoding. The latency was also noticeable after a bit.
|
||
|
|
|
||
|
|
However, when it worked it worked beautifully. I had to upgrade to the nightly
|
||
|
|
build of ALVR in order to get game audio and the headset mic working, but once
|
||
|
|
it all worked it was really convenient. I could walk around my apartment and
|
||
|
|
I'd also walk around in-game.
|
||
|
|
|
||
|
|
A friend told me that the best experience I could have with wireless VR using a
|
||
|
|
Quest 2 would be to use [Virtual Desktop](https://www.vrdesktop.net). Apparently
|
||
|
|
Virtual Desktop has a
|
||
|
|
[patch that enables SteamVR support](https://sidequestvr.com/app/16), so I
|
||
|
|
purchased Virtual Desktop on a whim and decided to give it a go.
|
||
|
|
|
||
|
|
Virtual Desktop made ALVR look like a tech demo. All of the latency issues were
|
||
|
|
solved instantly. Virtual Desktop also made it convenient for me to access my
|
||
|
|
tower's monitors while in VR, and it has the best typing experience in VR that
|
||
|
|
I've ever used.
|
||
|
|
|
||
|
|
This brings the dependency graph up to this:
|
||
|
|
|
||
|
|
<center>
|
||
|
|
|
||
|
|

|
||
|
|
|
||
|
|
</center>
|
||
|
|
|
||
|
|
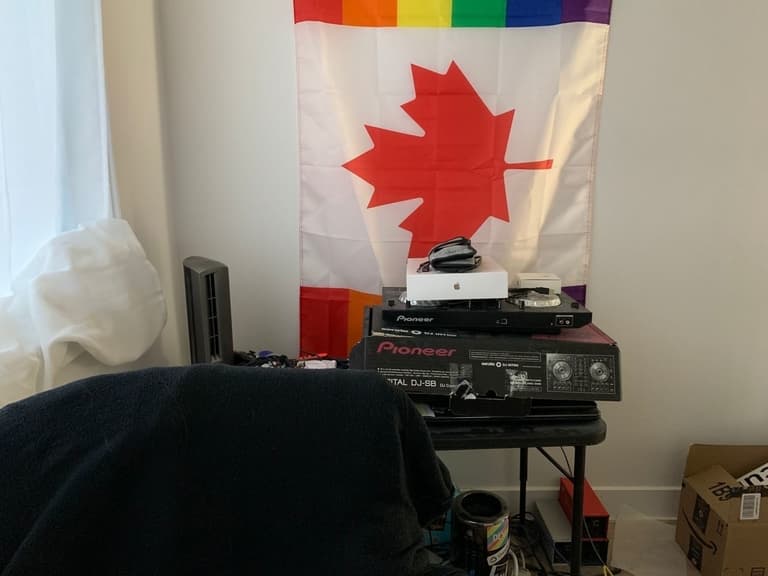
Now all that was left was to make the camera view look somewhat like it does
|
||
|
|
when I'm using my work laptop's webcam to make video calls. I started out by taking a picture of my office from about the angle that my laptop sits at.
|
||
|
|
I ended up with this image:
|
||
|
|
|
||
|
|
<center>
|
||
|
|
|
||
|
|

|
||
|
|
|
||
|
|
</center>
|
||
|
|
|
||
|
|
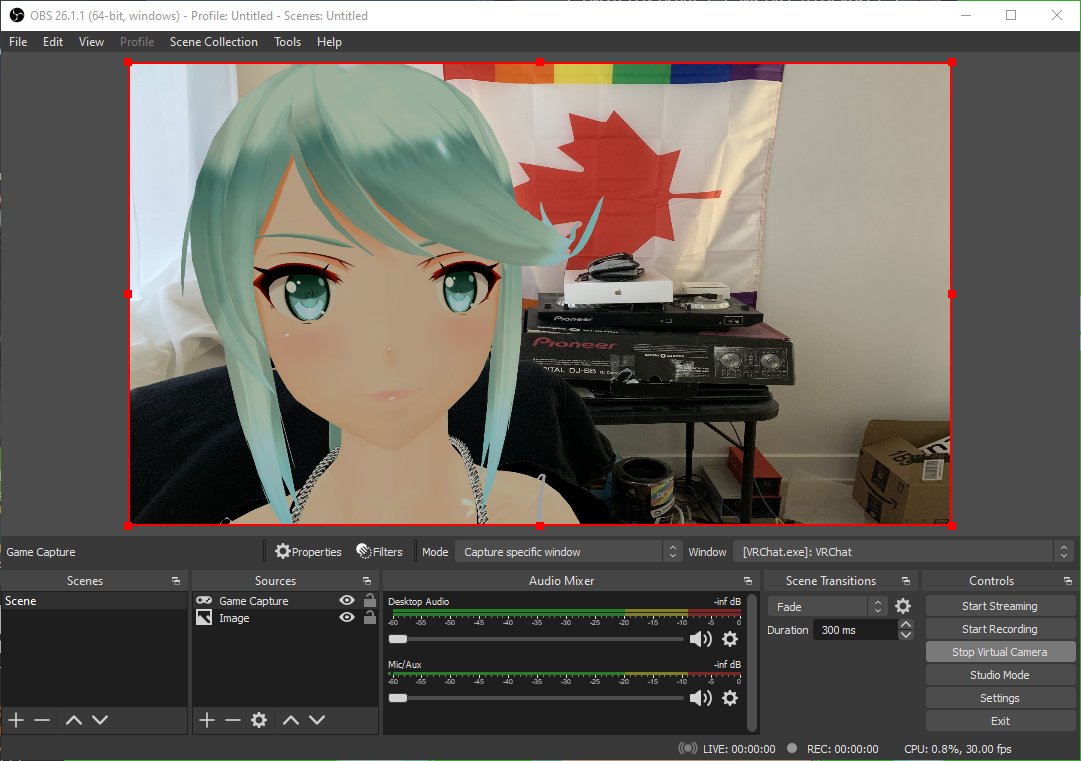
Then with some clever use of the
|
||
|
|
[Chroma key filter in VRChat](https://docs.vrchat.com/docs/vrchat-201812)
|
||
|
|
I was able to get some basic compositing of my avatar onto the picture. I
|
||
|
|
fiddled with the placement of things and then I was able to declare success
|
||
|
|
with this image I posted to Twitter:
|
||
|
|
|
||
|
|
<center>
|
||
|
|
|
||
|
|

|
||
|
|
|
||
|
|
</center>
|
||
|
|
|
||
|
|
And it worked! I was able to make a call in Google Meet to myself and my
|
||
|
|
avatar's lip movements synchronized somewhat with the words I was saying. I
|
||
|
|
had waifu mode enabled!
|
||
|
|
|
||
|
|
[The avatar being used there is based on a character from Xenoblade Chronicles
|
||
|
|
2 named Pneuma.](conversation://Mara/hacker)
|
||
|
|
|
||
|
|
However, this setup was really janky. I didn't actually get the proper angle
|
||
|
|
for what my work laptop's camera would actually see. Everything was offset to
|
||
|
|
the side and it was at way the wrong angle in general. I'm also not sure if I
|
||
|
|
messed up the sizing of the background image in the OBS view, it looks kinda
|
||
|
|
stretched on my end as I'm writing this post.
|
||
|
|
|
||
|
|
So I decided that the best way to get the most accurate angle was to record a
|
||
|
|
video loop using my work laptop's webcam. After some googling I found
|
||
|
|
[webcamera.io](https://webcamera.io) which let me record some footage of my
|
||
|
|
office from my work laptop's camera angle. I got down under the desk (so I was
|
||
|
|
out of view of the camera) and then recorded a 45 second loop of my office
|
||
|
|
doing nothing (however the flag was slightly moving in the breeze from the desk
|
||
|
|
fan).
|
||
|
|
|
||
|
|
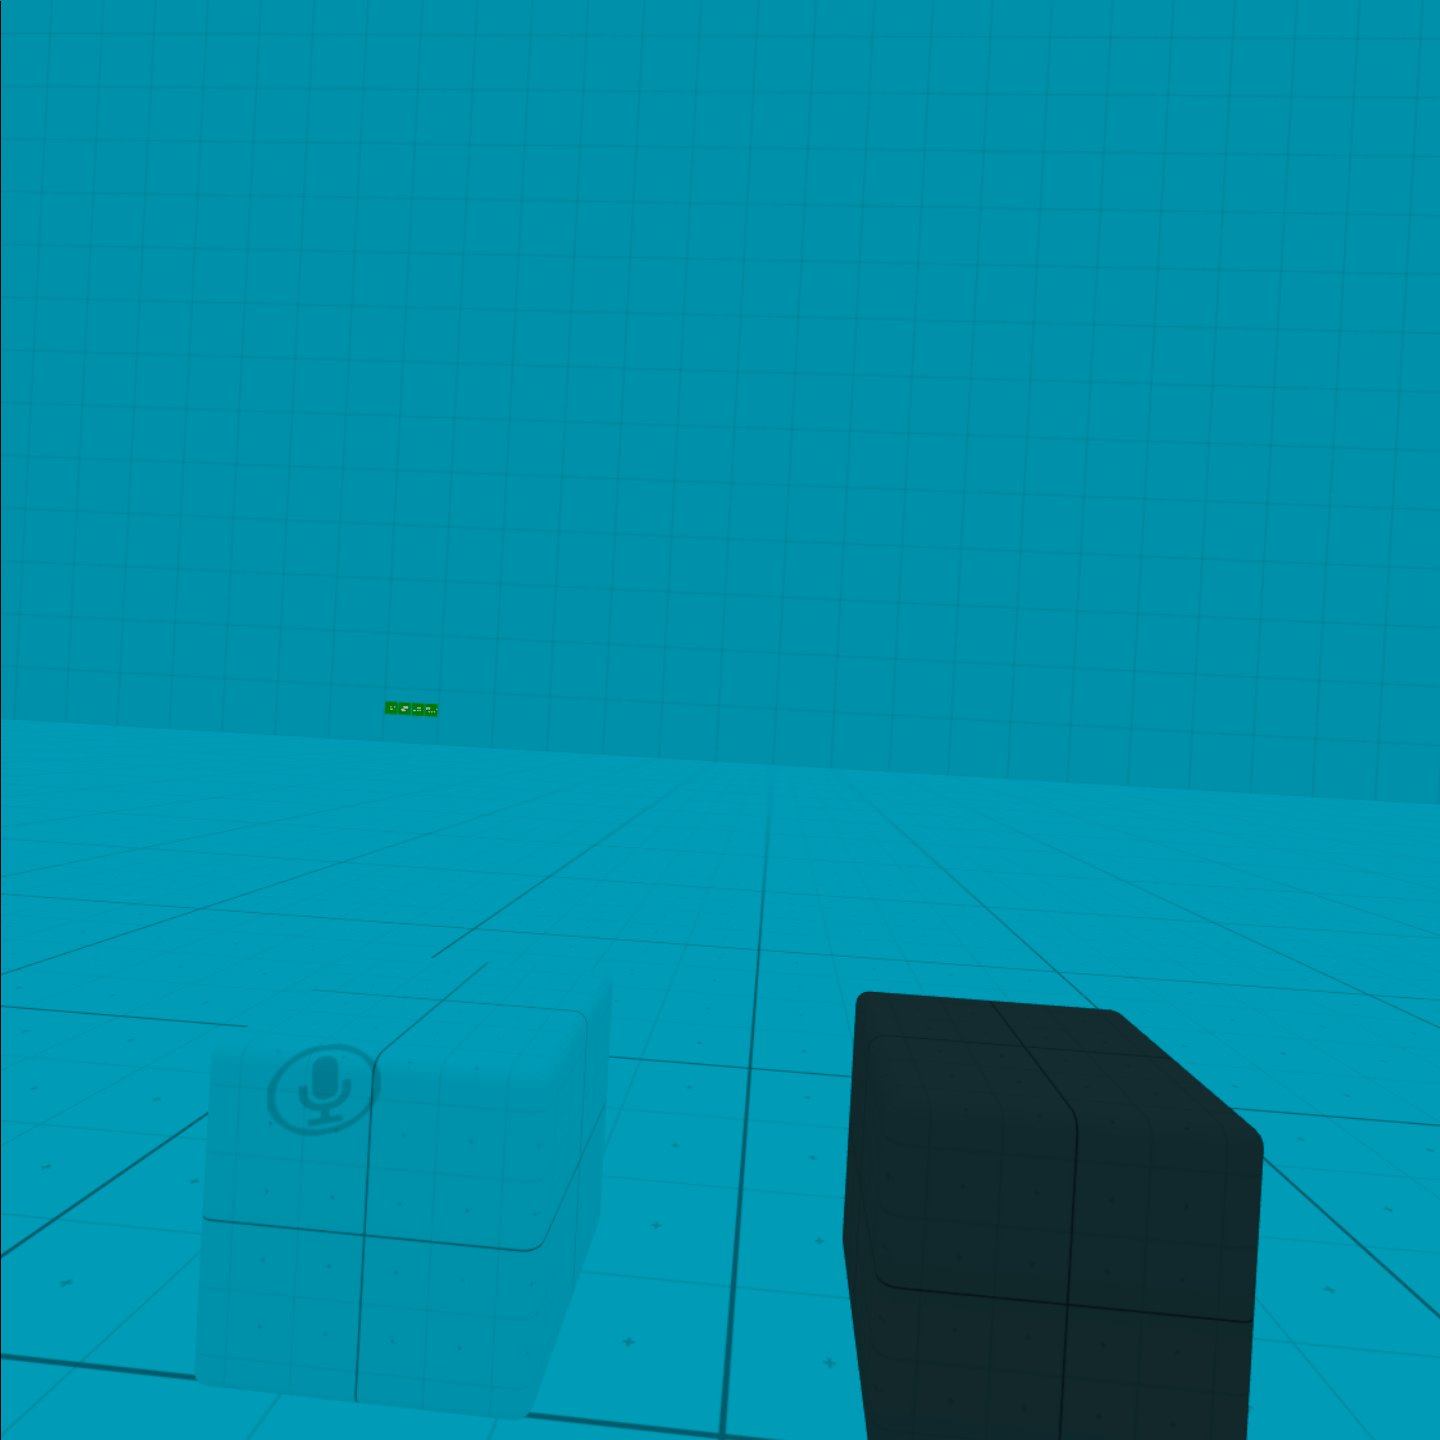
I also found a VRChat world that claimed to be as optimized as you could
|
||
|
|
possibly make a VRChat world. It was a blue cube about 30m by 30m. Checking
|
||
|
|
with SteamVR it brought my frame times down to 3 milliseconds with the stream
|
||
|
|
camera set up for OBS. It looks like this:
|
||
|
|
|
||
|
|
<center>
|
||
|
|
|
||
|
|

|
||
|
|
|
||
|
|
</center>
|
||
|
|
|
||
|
|
It's very minimal. You can make the walls go away if you want, which somehow makes it render faster on my RX5700. I'm not sure what's going on there.
|
||
|
|
|
||
|
|
[I'd heckin' love to get a new GPU but until the Bitcoin prices go down we may
|
||
|
|
be stuck with this setup for a while. An RTX 3070 would really be useful about
|
||
|
|
now.](conversation://Mara/hacker)
|
||
|
|
|
||
|
|
Anyways, with this minimal world incurring very little to no GPU load, I was
|
||
|
|
free to do video calls all I wanted. I even did a call with the CEO of the
|
||
|
|
company I work for with a setup like this. It was fun.
|
||
|
|
|
||
|
|
Now I had everything set up. I can pop on the headset, load up the world, open
|
||
|
|
OBS, VRChat, Virtual Desktop and get everything set up in about 5 minutes at
|
||
|
|
worst. Then I can use the seeing your desktop side of Virtual Desktop to
|
||
|
|
actually watch the meeting and be able to see screen sharing. They can hear me
|
||
|
|
because Virtual Desktop pipes the headset microphone audio back to my tower,
|
||
|
|
and the meeting audio comes over my headphones.
|
||
|
|
|
||
|
|
Also at some point I needed to bring AutoHotKey into the mix, so I borrowed
|
||
|
|
this AutoHotKey script from [SuperUser](https://superuser.com/a/429845) to
|
||
|
|
resize the VRChat window so that it would fit perfectly into the OBS view:
|
||
|
|
|
||
|
|
```ahk
|
||
|
|
#=:: ; [Win]+[=]
|
||
|
|
WinGet, window, ID, A
|
||
|
|
InputBox, width, Resize, Width:, , 140, 130
|
||
|
|
InputBox, height, Resize, Height:, , 140, 130
|
||
|
|
WinMove, ahk_id %window%, , , , width, height
|
||
|
|
return
|
||
|
|
```
|
||
|
|
|
||
|
|
Making the VRChat window smaller also helped with the frame times, because it
|
||
|
|
needed to render less detail per frame. This helped push the framerate
|
||
|
|
comfortably above 72 FPS in my VR view.
|
||
|
|
|
||
|
|
That is how I get a 3d avatar to show up instead of pictures of the meat golem
|
||
|
|
I am cursed inside of for work meetings. I will also use this for streaming
|
||
|
|
coding in the future, so you can all witness the power of a VTube coding stream
|
||
|
|
where I write Rust or something.
|